I love gallery walls! You can avoid having picture frames all over the house collecting dust and have them all on one statement wall. Here are my tips on how to make a gallery wall.
Pick a location. I have two gallery walls in my home. One is in the first room you walk into when you come into our house. It’s currently a play room but is supposed to be a formal dining room. The second place I have one is on a long wall that stretches upstairs between our bedroom and our youngest daughter’s room. Wherever you choose, make sure you eyeball the space you’re working with so you have a general idea of how many items and what sized items you’ll need to buy.
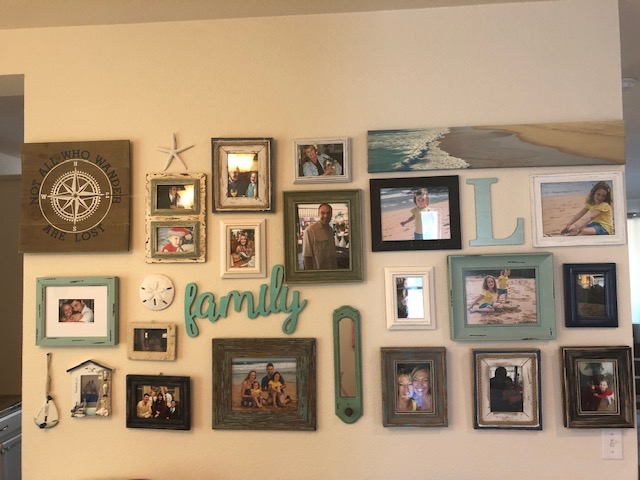
Pick a color scheme. You’ll know in three seconds flat upon walking into our home that I am the most sea-loving sonuvabitch you’ll ever meet living in a land-locked state. I love seashells and beachy neutral tones so our house is different shades of grey and white or beige and white and each room has a different color peppered in it. For our guest bath, it reminds me of Avignon with touches of lavender and green. For our master bedroom, it’s mainly silver, gold, and white and I either mix in navy or mint green bedding and rugs depending on the time of year. Lila’s room is pastel pink and teal and Winnie’s room is bright yellow and pink. The man cave is burgundy since my husband went to Denver University and crimson is one of their colors. Our main gallery wall is in our formal living room and I tied in mint green, teal, and distressed woods for the beachy look. Once you have your location picked out, decide what colors you want to pull in.
Pick a theme. Love the beach like me? Grab some distressed wooden picture frames at Hobby Lobby or Michael’s, and while you’re there grab starfish or canvas photos with beach scenes on them. Whatever your theme is, try to tie in picture frames that go along with that as well as other items that aren’t standard frames. On our gallery wall, I bought a wooden monogram “L” and painted it a mix of gold and teal so it looks iridescent and ties in our colors of the wall. Then I got a few canvas photos and mirrors of different sizes so it wouldn’t be just plain frames on the wall.
Start with larger pieces then fill in the gaps. Lay everything out on your floor and arrange your larger frames how you want. Then pepper in smaller frames or mirrors or trinkets.
Measure! I am lazy when it comes to making things exact, especially on walls. So rather than measuring every frame out and making sure the space between each frame was perfect, I just arranged how I wanted the wall to look on the floor. Then, measure the entire group. I measured how tall and how wide the entire collection was. Then I went to the wall and just marked with a pencil where those measurements would hit so I would know where to set the first frame. I then set the first frame and then set where the bottom of the bottom frame would hit and just knew I had to keep everything else within those boundaries.
Now, there are a ton of ideas on Pinterest on how to make sure your wall is measured perfectly. I saw one idea where the person traced every item they were hanging on the wall onto paper and then taped the paper up on the wall. Then they drove a nail through the paper, hung the picture over the paper, and then tore the paper off. I don’t have time for that shit. After I measured my entire collection once it was laid out on the floor it, it was around 42″ wide and 90″ long. So on my wall, I made a mark where the top left of it would it and just worked my way across. You’ll see from my picture that it’s not exact, but it works for me and didn’t require hours of measuring. But if you are a perfectionist, there are plenty of tips out there on how to measure your wall.
I love symmetry. It’s how my brain works best. So even though I have an odd number of frames and trinkets on my gallery wall, I made it into two different sections that are even within themselves. You can see the photo of mine to get a better understanding of what I mean. For other tips and tricks, Pottery Barn and Crate and Barrel both have examples of different types of gallery walls. Just take your time and don’t be afraid to make an extra couple of holes in your wall because with a gallery wall, you’re already going to have a ton of holes in it anyways! Good luck!

